 |
MicroPay 3.x System Requirements
Minimum Requirements
- Intel i3 Processor or greater
- 4 GB RAM
- At least 500 MB free hard disk space
- Ink Jet and/or Laser printer (Laser printer recommended for printing TD4s)
- USB Port or Internet access (Required for installation)
- Microsoft Windows 7 (Professional or Ultimate versions only) or greater (inclusive of all service packs)
- Microsoft SQL Server 2012 Express with Management Studio must be installed on the server.
This is to be done prior to the visit by the MCS Support representative for installation of the software. This can be found at: https://download.microsoft.com.
Network Server Minimum Requirements
- MicroPay will perform best on a dedicated network server with at least 8GB RAM.
- Windows Server 2008 R2
For Apple products: Parallels Desktop for MAC should be installed http://www.parallels.com/products/desktop/
Compatibility Issues
For clients using SAGE Accounting software (Peachtree, DacEasy, et al), please note that some versions of Pervasive SQL used by these applications are incompatible with Microsoft SQL Server 2012. We therefore do not recommend that Microsoft SQL Server 2012 be installed on the same server as your Accounting application.
Clients may opt for either of the following solutions:
- A dedicated PC to be used as the payroll server.
- On the existing network server, install Windows Virtual PC (use Windows 7 Professional, Windows 7 Ultimate, or higher) to facilitate the Microsoft SQL installation.
Windows Virtual PC can be found at this link: https://www.microsoft.com/en-us/download/details.aspx?id=3702
Installation Steps
- Install Microsoft SQL Server 2012 Express with Management Studio
- Use 'Mixed Mode' authentication (unless it is a single installation with no plans for any additional client connection, then you may use 'Windows Authentication Mode').
- Install CRRuntime 32 bit for Crystal Reports
- Install Native Clients – sqlncli
- Both 'sqlncli' and 'sqlncli 2008 R2' for your operating system version, 32 or 64 bit)
- Run Micropay 2012 Setup
- Download the Latest Updates from the link provided. Extract to a new folder. Move the extracted files to/overwrite the Micropay setup installed files
- The Micropay setup installed files are typically located at "C:\Program Files (x86)\MCS Software Limited\MicroPay"
- For remote support, download and install Team Viewer or Team Viewer Quick Support, version 12 (or earlier). See the Useful Programs section below
- Log in to the SQL Management Studio. For first time installations of MicroPay, the company database would now be restored from a backup
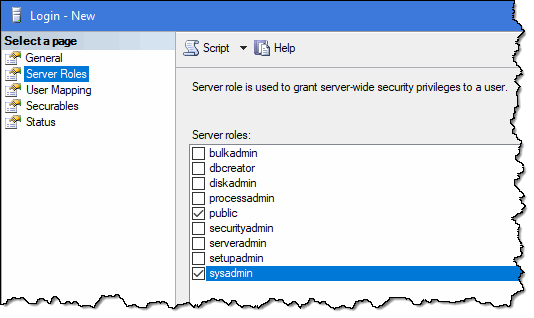
- Create a new SQL "Logins" and ensure that their "Server Roles" has "sysadmin" selected
- Create a backup folder
- MicroPay backups can only be saved to a configured folder. It is convenient to create this folder in the root directory of the SQL Server system
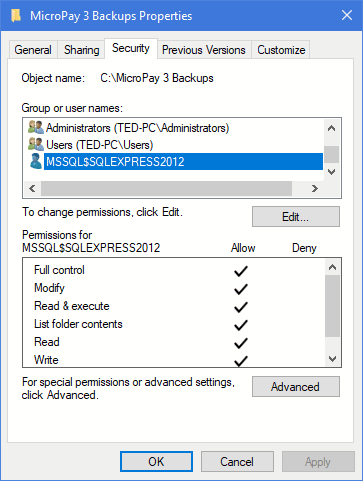
- Right click on the newly created backup folder and go to its "Security" properties
- Add the "SQL account" and allow it Full control

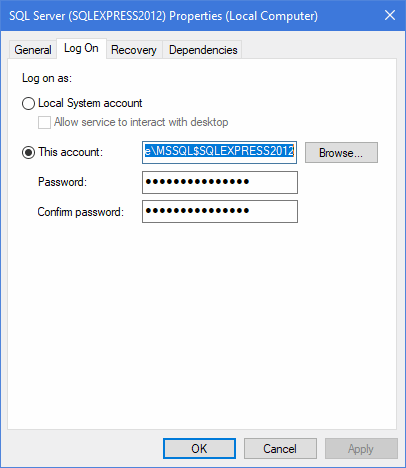
- The SQL account name can be found by opening Windows Services, scroll down to the entry for "SQL Server (instance name)", right click on this entry and go to its "Log On" properties.

- Copy the "This account:" name and add it to the "MicroPay 3 Backups" security properties group listing as mentioned above
- Link MicroPay to the SQL server (one time event)
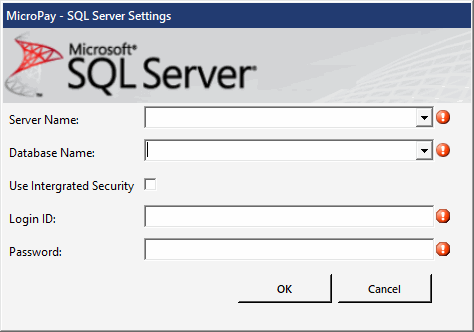
- When you run MicroPay for the first time, you will be prompted to enter the SQL connection authentication information

- The "Server Name" is the same as that which is displayed when you log onto the Microsoft SQL Server Management Studio porgram
- The "Login ID" and "Password" is that which you would have created in step "7" above
- The "Database Name" displays automatically once all of the SQL connection information are correct. You are NOT to type in the database name
- Click "Ok" once you can select your database name
- Log in to MicroPay using the default "Demo" account credentials and create a new administrator and other users as required
Installation Files
- Microsoft SQL Server 2012 Express with Management Studio
- Crystal Reports Runtime - 32 bit
- Native Clients
- MicroPay 2012 Setup
- Latest Updates
- Auto Updater
Useful Programs
- Team Viewer - For support via remote access
- Team Viewer Quick Support - For support via remote access
- Adobe Acrobat Reader 9.0
- WinRAR x86 (32 bit) 5.01
- WinRAR x64 (64 bit) 5.01
- WinZip 22
(or)
Things to Note
Serial Numbers - when accessing the databases for the first time in MP, you will be prompted to enter the SN for each. If you don't have a record of the SNs, you can obtain them by logging on to another MP installation and going to the Help->About menu.
Feel free to call/email our office if you have any concerns.
MicroPay 3.0
For details on the benefits of MicroPay 3, please visit the product page at our website: http://mcssoftware.biz/?page_id=63
You may contact your respective sales representative for further information.


